updated on: 2021-03-27
To-Do:
- List their permissions
- Transfer and receive files with scp
- Enable MFA/2FA
- Setup an SFTP server
- Port Forwarding aka. Tunneling
- Local Port Forwarding(sub)
- Remote Port Forwarding(sub)
- Dynamic Port Forwarding(sub)
- Encapsulating Tunnels(sub)
- Tunneling Over HTTP(sub)
- SCP Port Forward(sub)
- Protect SSH
- Troubleshooting
OpenSSH is a suite of networking tools based on the Secure Shell(SSH) protocol. It is used to encrypt the communication or traffic between two nodes.
The OpenSSH suite includes the following command-line utilities and daemons:
scp: securely transferring computer files between two hosts(a replacement for rcp)sftp: a secure version of ftpssh: encrypted shell access or remote code execution on a machine( a replacement for telnet, rsh, rlogin)ssh-addandssh-agent: utilities to hold keys in memory and avoid the need to enter a password or passphrase upon each ssh transactionssh-keygen: a tool to inspect, manage and generate the RSA, DSA and Elliptic Curve keys that are used for authenticationssh-copy-id: to copy a public key on a remote host(to enable pub-key auth)ssh-keyscan: a utility for gathering public ssh-host from a number of hosts and gathered keys from host that have access to the serversshd: the SSH server daemon that listens for incoming connectionssh: the ssh client
For a deeper understanding on how SSH works behind the scene, I recommend reading the following resources in order:
Stage 1: Symmetric Encryption - The key exchange process(it’s complicated)
Stage 2: Asymmetric Encryption - User authentication(private and public key verification)
Stage 3: Connection layer - Interactive sessions and port forwarding
Installation and Firewall Rules
Redhat based
yum update -y ; yum install openssh openssh-server openssh-clients -y
Allow incoming connections:
firewall-cmd --permanent --zone=public --add-service=ssh
Then reload the firewalld daemon:
firewalld-cmd --reload
Note: By default, only the public zone is available. If you’re new to
firewalld, read its manual.
Debian Based
sudo apt-get update -y ; apt-get install openssh-server -y
Allow incoming connections:
sudo ufw enable; ufw allow ssh
Now when you run ufw status, you should see the following(again, depends on your configuration):
root@ubuntuserver:~# ufw status

To                         Action      From
--                         ------      ----
22/tcp                     ALLOW       Anywhere
22/tcp (v6)                ALLOW       Anywhere (v6)

root@ubuntuserver:~#
Note: By default, all incoming connections are allowed.
Configuration Files
The OpenSSH server is up and running. Now its configuration files can be tweaked according to your needs. There are 3 types of configurations:
/etc/ssh/sshd_config- System wide configuration for the ssh server (for incoming connections)/etc/ssh/ssh_config- System wide configuration for clients (for outgoing connections)~/.ssh/or$HOME/.ssh/- User specific directory which will contain the private and public keys.~/.ssh/configor$HOME/.ssh/config- User specific configuration file (for outgoing connections)
I won’t list all the availables configs. Look at the files, and if you don’t understand something, consult the man pages: here.
Note: The
~/.sshfolder will be available when you generate your own public and private keys. Or when you connect to a server for the first time. But~./ssh/configneeds to created with the following permission-rwx---or0700.
Permissions
Both the host and the client should have the following permissions and owners:
~/.sshpermissions should be 700 and owned by your account.~/.ssh/authorized_keyspermissions should be 600 and owned by your account.
Client environments should additionally have the following permissions and owners:
~/.ssh/configpermissions should be 600 or 644~/.ssh/id_*permissions should be 600
Key Pairs and Associated Files
During stage 2, SSH uses Asymmetric Encryption for authentication. This method of encryption consists of a key pair: a Private and a Public key.
The public key is publicly available, while the private key is kept secret. Both Server and Client have their own key pairs.
The encryption is done using the public key. The encrypted data is decrypted using the private key. Only the owner of the private key can read the encrypted data.
Server Keys
The server host keys(private and public) is generated upon the installation of OpenSSH. They look like this:
root@ubuntuserver:/home/kavish# ls /etc/ssh | grep key
ssh_host_dsa_key
ssh_host_dsa_key.pub
ssh_host_ecdsa_key
ssh_host_ecdsa_key.pub
ssh_host_ed25519_key
ssh_host_ed25519_key.pub
ssh_host_rsa_key
ssh_host_rsa_key.pub
Files with .pub extension represent the public keys. By default the ecdsa algorithm is used. As stated in the release notes of OpenSSH(truncated):
ECDSA was introduced into openssh with version 5.7.

Implement Elliptic Curve Cryptography modes for key exchange (ECDH) and host/user keys (ECDSA) as specified by RFC5656.
ECDH and ECDSA offer better performance than plain DH and DSA at the same equivalent symmetric key length, as well as much shorter keys.

.......

ECDH in a 256 bit curve field is the preferred key agreement algorithm when both the client and server support it.
ECDSA host keys are preferred when learning a host's keys for the first time, or can be learned using ssh-keyscan(1).
Note: Every algorithm used from ciphers to hostkeys can be changed in
/etc/ssh/sshd_config. But OpenSSH only disables algorithms because they are known to be weak. Use the default ones provided. Unless you want to have access to a server that has an old version of ssh, you’re on your own.
The public key is algorithmically derived from your private key, but not vice-versa.
Connecting to a server for the first time
The syntax is simple: ssh username@server-address
The first time you try to connect to a server, the fingerprint of its public key is presented to you to verify before proceeding(on line 3):
MacBook-Pro:.ssh kavish$ ssh kavish@192.168.100.64
The authenticity of host '192.168.100.64 (192.168.100.64)' can't be established.
ECDSA key fingerprint is SHA256:KAt3Ifz0tzjpLWXPgz2LoqkNswPASWUW1TkvQAgOyfk.
Are you sure you want to continue connecting (yes/no)? yes
Warning: Permanently added '192.168.100.64' (ECDSA) to the list of known hosts.
kavish@192.168.100.64's password:

Welcome to Ubuntu 18.04.4 LTS (GNU/Linux 4.15.0-88-generic x86_64)

kavish@ubuntuserver:~$
Note: To connect to ssh that is listening on a different port use
-p.
The fingerprint is the server’s public key located in /etc/ssh/. By typing yes and accepting the public key, ssh will put the public key in your ssh local database - ~/.ssh/known_hosts, then you input the password of the user that you’re about to login to get a remote shell.
The known_hosts file contains every hostname/IP, and public key of which you accepted or server you had access with. The next time you connect to a host, the ssh client verifies the file to check if the host has its public key already in your local database, and if it has changed, end the connection, else continue.
Note: The first time you accept a public key, the
known_hostsis created automatically.
If the server has been configured to ignore password based logins and only accept public key authentication, access will be denied(on line 6) because you don’t have a copy of your public key on:
MacBook-Pro:.ssh kavish$ ssh kavish@192.168.100.64
The authenticity of host '192.168.100.64 (192.168.100.64)' can't be established.
ECDSA key fingerprint is SHA256:KAt3Ifz0tzjpLWXPgz2LoqkNswPASWUW1TkvQAgOyfk.
Are you sure you want to continue connecting (yes/no)? yes
Warning: Permanently added '192.168.100.64' (ECDSA) to the list of known hosts.
kavish@192.168.100.64: Permission denied (publickey).
In that case, you’ll have to ask the administrator of the remote host give you access.
You notice the first thing that happens when a connection is being established, is that the server sends its public key to client. Then the client will generate a message, encrypts it with the public key for the server to decrypts and send the message back for proof. This way the client knows that server is who it claims to be.
Now, let’s say the server’s public key has changed by reinstalling openssh or there’s someone else impersonating the server. The next time you connect to that server, your ssh client will notice that the public key is not same by looking up its local database. If so, you’ll get the following warning:
MacBook-Pro:~ kavish$ ssh kavish@192.168.100.64
@@@@@@@@@@@@@@@@@@@@@@@@@@@@@@@@@@@@@@@@@@@@@@@@@@@@@@@@@@@
@    WARNING: REMOTE HOST IDENTIFICATION HAS CHANGED!     @
@@@@@@@@@@@@@@@@@@@@@@@@@@@@@@@@@@@@@@@@@@@@@@@@@@@@@@@@@@@
IT IS POSSIBLE THAT SOMEONE IS DOING SOMETHING NASTY!
Someone could be eavesdropping on you right now (man-in-the-middle attack)!
It is also possible that a host key has just been changed.
The fingerprint for the ECDSA key sent by the remote host is
SHA256:QsUILFeKPhM++tflux13ZuN6WxxEpK2KpUvrJ1+Rb5o.
Please contact your system administrator.
Add correct host key in /Users/kavish/.ssh/known_hosts to get rid of this message.
Offending ECDSA key in /Users/kavish/.ssh/known_hosts:1
ECDSA host key for 192.168.100.64 has changed and you have requested strict checking.
Host key verification failed.
MacBook-Pro:~ kavish$
Note: Ask the administrator - “why the key has changed”.
User Specific Key
User specific keys needs to be generated.
By default OpenSSH is configured to accept both password and public key authentication. But for the latter, you’ll have to generate your own keys and send your public key on the server.
Generating ssh keys with ssh-keygen:
MacBook-Pro:.ssh kavish$ ssh-keygen
Generating public/private rsa key pair.
Enter file in which to save the key (/Users/kavish/.ssh/id_rsa):
Enter passphrase (empty for no passphrase):
Enter same passphrase again:
Your identification has been saved in /Users/kavish/.ssh/id_rsa.
Your public key has been saved in /Users/kavish/.ssh/id_rsa.pub.
The key fingerprint is:
SHA256:xj9/Ie3r/2slXM2FHjr4+dZEHqNzVpR92mUmfD/KmXg kavish@MacBook-Pro.local
The key's randomart image is:
+---[RSA 2048]----+
|             . .o|
|              =.X|
|           . o @*|
|       .  . o o+O|
|        S  .o==+=|
|       . . .+E=o+|
|          o .++=.|
|           o  =..|
|            .+++=|
+----[SHA256]-----+
Invoking ssh-keygen without any arguments, generates an RSA key pair with a size of 2048 bits for both keys.
Note: The string
kavish@MacBook-Pro.localon line 9 is a comment. It has nothing to do with your public key. It’s your username and hostname.
The passphrase encrypts your private key. Use a strong one. During public key authentication, you’ll have input your passphrase to decrypt the private key. It all happens locally. Your passphrase is never transmitted over the internet.
Your private and public key will be located in ~./ssh:
MacBook-Pro:.ssh kavish$ ls -l
total 16
-rw-------  1 kavish  staff  1876 Mar  3 21:52 id_rsa
-rw-r--r--  1 kavish  staff   406 Mar  3 21:52 id_rsa.pub
To generating keys with different algorithm use -t and -C for comment:
MacBook-Pro:.ssh kavish$ ssh-keygen -t ecdsa -C "kavish_mail_server"
Generating public/private ecdsa key pair.
Enter file in which to save the key (/Users/kavish/.ssh/id_ecdsa):
Enter passphrase (empty for no passphrase):
Enter same passphrase again:
Your identification has been saved in /Users/kavish/.ssh/id_ecdsa.
Your public key has been saved in /Users/kavish/.ssh/id_ecdsa.pub.
The key fingerprint is:
SHA256:yl6UseGl7UvqCifPNrYqwKelHV+O95Daps7ZGjpRtus kavish_mail_server
The key's randomart image is:
+---[ECDSA 256]---+
|                 |
|                 |
|        o .      |
|     o . O       |
|.   o . S .      |
|.. = o +..       |
| .* *.Oo. o      |
| o.oo@X=.o .     |
|   o=E@B+..      |
+----[SHA256]-----+
You can give the key any name you want.
If you lost your public key, you can re-generate it with the ssh-keygen utility by specifying the location of your private key(read its man page for more details). Here’s an example:
MacBook-Pro:.ssh kavish$ ssh-keygen -yf id_rsa
Enter passphrase:
ssh-rsa AAAAB3NzaC1yc2EAAAADAQABAAABAQDijpjxeW0liurNZqhUxdVUxBmnbLIrUE4gkSJAee906R4RidOWl7oyz9fqaL4aNKykjMgbh7T2z9r8Jbxs3YcbEDB5xRo0yIsxsbTG4C7Tfx89ap/0B/Wgf9vg7yqiJ+db0Cdxjv6KdzC3XP1pT09XcbqycRcWe8Fl7Y9z7Z1RaHCSZaHLfrza9M/gUYtXZThDofQKU3XtrbQsoFrumCsGCVJWKlj1g/yJOyiqkCD1iGPxX4U2AMpdJJlAROjQG6z+QmtqtFO8//nLihig217Z7qKsxhV0xlLzPNJU4Y1UzIeHcWQNN/AYm12N4FFgOBWJhfBMQw0a3OU9uB81lfiN
Public Key Authencation
For public key authentication, you’ve to copy your public key on the server. To be more specific, you have to append your key in the ~/.ssh/authorized_keys file of the remote user that you want to login as. The ssh-copy-id utility is used for this.
Note: The
known_hostsfile lets the client authenticate the server, to check that it isn’t connecting to an impersonator. Theauthorized_keysfile lets the server authenticate the user.
ssh-copy-id will login into server using password authentication, and append the key. Password authentication should be enabled on the server:
MacBook-Pro:.ssh kavish$ ssh-copy-id kavish@192.168.100.64
/usr/bin/ssh-copy-id: INFO: Source of key(s) to be installed: "/Users/kavish/.ssh/id_rsa.pub"
The authenticity of host '192.168.100.64 (192.168.100.64)' can't be established.
ECDSA key fingerprint is SHA256:QsUILFeKPhM++tflux13ZuN6WxxEpK2KpUvrJ1+Rb5o.
Are you sure you want to continue connecting (yes/no)? yes
/usr/bin/ssh-copy-id: INFO: attempting to log in with the new key(s), to filter out any that are already installed
/usr/bin/ssh-copy-id: INFO: 1 key(s) remain to be installed -- if you are prompted now it is to install the new keys
kavish@192.168.100.64's password:

Number of key(s) added:        1

Now try logging into the machine, with:   "ssh 'kavish@192.168.100.64'"
and check to make sure that only the key(s) you wanted were added.
Now when you log into the remote server, you have to decrypt your private key with your passphrase:
MacBook-Pro:.ssh kavish$ ssh kavish@192.168.100.64
Enter passphrase for key '/Users/kavish/.ssh/id_rsa':

Welcome to Ubuntu 18.04.4 LTS (GNU/Linux 4.15.0-88-generic x86_64)


Last login: Wed Mar  4 07:15:30 2020
kavish@ubuntuserver:~$
It’s more secure than password authentication, but you have to input your passphrase every time you use your private key. It’s a waste of valuable time. ssh-agent and ssh-add will take care of that.
Here’s a visual presentation:
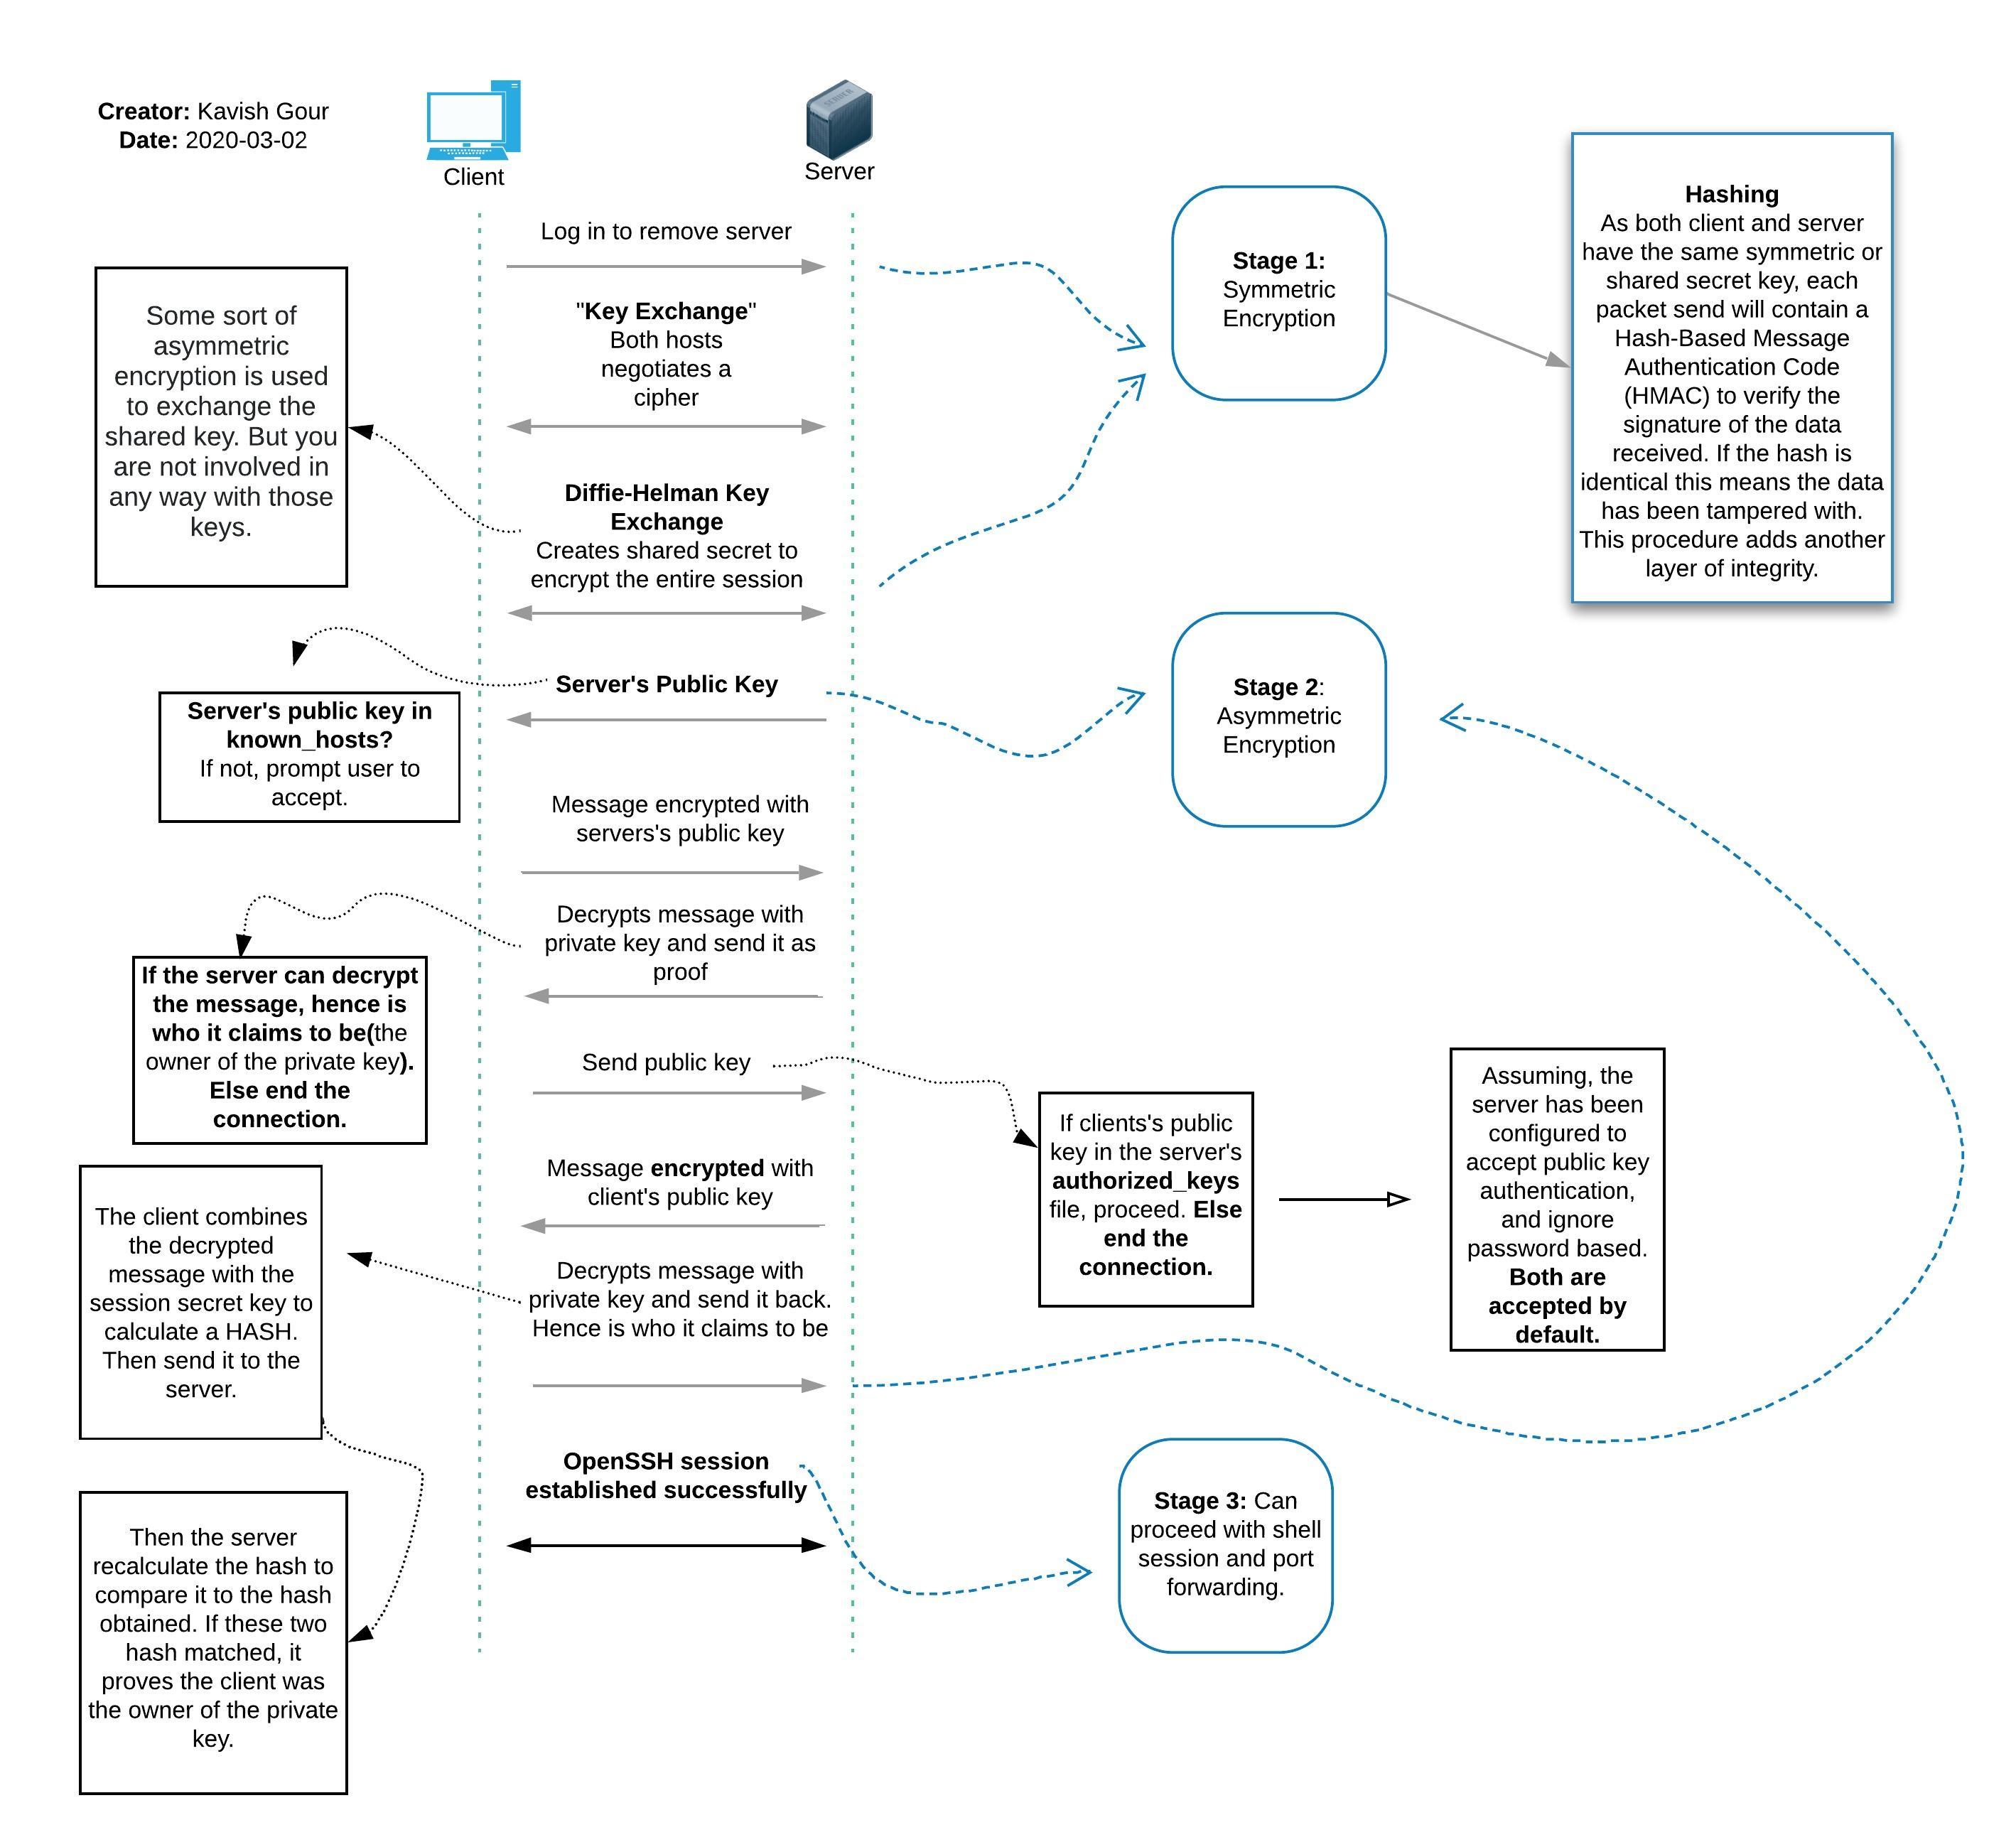 Fig. 1: OpenSSH Connection Stages
Note: When your copy your public key on a remote server, you can only use that key to login as that user.
ssh-agent and ssh-add
ssh-agent will hold your private key in memory so that you don’t have to keep typing your passphrase each time you connect to a server. ssh-add will basically tell the agent that you have a key to add.
First, start the agent through eval:
MacBook-Pro:~ kavish$ eval $(ssh-agent)
Agent pid 7670
Why eval? Because the agent will declare two variables:
SSH_AUTH_SOCK: The unix-domain socket to communicate withssh_addandssh.SSH_AGENT_PID: The process ID of the agent
Once the agent is running, add your private key with ssh-add by specifying its location as an argument:
MacBook-Pro:~ kavish$ ssh-add ~/.ssh/id_rsa
Enter passphrase for /Users/kavish/.ssh/id_rsa:
Identity added: /Users/kavish/.ssh/id_rsa (kavish@MacBook-Pro.local)
You will only input your passphrase once(for each key that you’re adding).
Note: If you don’t specify a key, you’ll get a prompt to enter the passphrase for all the keys that you own.
Now login as usual without being prompted to input your passphrase:
MacBook-Pro:~ kavish$ ssh kavish@192.168.100.64

Welcome to Ubuntu 18.04.4 LTS (GNU/Linux 4.15.0-88-generic x86_64)


Last login: Wed Mar  4 07:35:34 2020 from 192.168.100.3
kavish@ubuntuserver:~$
From the man page of
ssh-add: If any file requires a passphrase, ssh-add asks for the passphrase. The passphrase is read from the user’s tty.ssh-addretries the last passphrase if multiple identity files are given.
Are multiple keys more reliable if you have access to multiple servers?
I can’t think of good reason to have one than one key.
Personally, I only use one key pair. If i need to access multiple machines, I just add my public key to the authorized_keys file on the remote server.
Let’s say you have access to your mail server, web server, lab environments, production systems and so on. If you use the same key to access all those machines, and one of those machine got compromised, you got nothing to worry about. The only issue is the privacy of your private key.
The definitive answer is: EVALUATE YOUR THREAT MODEL. Here’s a good resource to start with.
User-Specific Configuration
If you’re regularly connecting to multiple remote systems on a daily basis, you’ll find that remembering all of the remote IP addresses, usernames, ports, and command line options is nearly impossible.
First create the ~/.ssh/config file:
touch ~/.ssh/config && chmod 600 ~/.ssh/config
~/.ssh/config or $HOME/.ssh/config - user’s specific configuration file which takes precedence over the global client configuration file, /etc/ssh/ssh_config.
Here’s some examples:
MacBook-Pro:.ssh kavish$ echo ; cat config

Host centos8
    hostname 192.168.100.63
    user kavish
    port 22
    identityfile "~/.ssh/id_rsa"
Host ubuntu
    hostname 192.168.100.64
    user kavish
    port 22
    identityfile "~./ssh/id_rsa"
    pubkeyauthentication yes
Host test
    hostname 192.168.100.70
    user tester
    port 2040
    identityfile "~/.ssh/id_ecdsa"
The remote servers are separated by the Host keyword. To connect to my ubuntu host, I just type ssh ubuntu:
MacBook-Pro:.ssh kavish$ ssh ubuntu
Enter passphrase for key '/Users/kavish/.ssh/id_rsa':

Welcome to Ubuntu 18.04.4 LTS (GNU/Linux 4.15.0-88-generic x86_64)


Last login: Sat Mar  7 11:11:28 2020
kavish@ubuntuserver:~$
Note: The
pubkeyauthenticationyesoption is not necessary if you already have your public key on the server, but it’s good for remembering on which server you have passwordless access.
Let’s take the test host for example. Without a configuration file, I would have to type the whole thing on the command line:
ssh test@192.168.100.70 -i ~/.ssh/id_ecdsa -p 2040
Some linux experts recommend having multiple configuration files in your ~/.ssh folder for better management. That way you have to tell the ssh client which config file to read. It’s the worst! Let me introduce you to StormSSH.
StormSSH
storm is a command line tool written in Python 3 to manage your ssh connections. With storm you can take care of your ~/.ssh/config file in a more efficient manner. It also has a web interface.
Install on Linux
pip3 install stormssh
Install on macOS
brew install stormssh
To enable tab completion for StormSSH do the following(for both macOS and Linux):
cd ; curl -o .storm_tab_completion https://raw.githubusercontent.com/emre/storm/master/contrib/bash-completion/stormssh
The add the following to .bashrc:
echo 'source ~/.storm_tab_completion' >> .bashrc && source .bashrc
Usage
This is all the things you can do with storm:
MacBook-Pro:~ kavish$ storm
add         clone       delete_all  list        search      version
backup      delete      edit        move        update      web
Read the documentation to learn more.
Adding a new host
MacBook-Pro:~ kavish$ storm add lab_server labadmin@10.10.10.10:2121 --id_file='~/.ssh/labkey'
success  lab_server added to your ssh config. you can connect it by typing "ssh lab_server".
Now run storm list to view your configurations:
MacBook-Pro:~ kavish$ storm list
 Listing entries:

    centos8 -> kavish@192.168.100.63:22
	[custom options] identityfile="~/.ssh/id_rsa"

    lab_server -> labadmin@10.10.10.10:2121
	[custom options] identityfile="~/.ssh/labkey"

    ubuntu -> kavish@192.168.100.64:22
	[custom options] identityfile="~/.ssh/id_rsa"
Here’s the best part:
MacBook-Pro:~ kavish$ cat .ssh/config
Host centos8
    hostname 192.168.100.63
    user kavish
    port 22
    identityfile "~/.ssh/id_rsa"
Host ubuntu
    hostname 192.168.100.64
    user kavish
    port 22
    identityfile "~/.ssh/id_rsa"
Host lab_server
    hostname 10.10.10.10
    user labadmin
    port 2121
    identityfile "~/.ssh/labkey"
SSH Command Line Options
Use --o to use ssh command line options:
MacBook-Pro:~ kavish$ storm add webmin admin@whatever.stop --o "PubKeyAuthentication=yes" --o "UserKnownHostsFile=/dev/null"
success  webmin added to your ssh config. you can connect it by typing "ssh webmin".

#search
MacBook-Pro:~ kavish$ storm search webmin
Listing results for webmin:
    webmin -> admin@whatever.stop:22

#listing
MacBook-Pro:~ kavish$ storm list
 Listing entries:
--snip--
    webmin -> admin@whatever.stop:22
	[custom options] pubkeyauthentication=yes userknownhostsfile=/dev/null
MacBook-Pro:~ kavish$
MacBook-Pro:~ kavish$ cat .ssh/config
--snip--
Host webmin
    hostname whatever.stop
    user admin
    port 22
    pubkeyauthentication yes
    userknownhostsfile /dev/null
MacBook-Pro:~ kavish$
Web Interface
Run storm web:
MacBook-Pro:~ kavish$ storm web
 * Serving Flask app "storm.web" (lazy loading)
 * Environment: production
   WARNING: This is a development server. Do not use it in a production deployment.
   Use a production WSGI server instead.
 * Debug mode: off
 * Running on http://127.0.0.1:9002/ (Press CTRL+C to quit)
Then browse to http://127.0.0.1:9002. To start the interface on a different port, run:
storm web 1234
Transfer Files with SCP
scp uses ssh to copy files between hosts. It has the same protection that ssh provides - encryption algorithm, public key/password authentication, and so on. The only difference is the syntax, and instead of executing commands, it copies data.
Copy file from a remote host to the local host
Syntax: scp user@remotehost:[file on server] [/path/on/your/machine]
scp admin@remotehost:file.txt /home/admin/
Copy a file from local host to a remote server
Syntax: scp [file to copy] user@remotehost:[/path/on/server]
scp file.txt admin@remotehost.edu:/home/admin
Copy a directory from the local host to a remote host’s directory
Syntax: scp -r [directory to be copied] admin@remotehost:[remote directory]
scp -r secretfolder admin@remotehost.edu:/root/topsecret/
Copy a file from a server to another server
Syntax: scp admin@server1:[remote file.txt] admin2@server2:[remote directory]
scp admin@server1:/home/admin/foobar.txt admin2@server2:/home/admin2/
Copy multitple files from local host to a remote server
Syntax: scp [file1] [file2] admin@remotehost:[remote directory]
scp file1 file2 admin@remotehost:/home/admin
Copy a file local host to remote host using a different port
Syntax: scp -P [port number] [file] admin@remotehost:[remote directory]
scp -P 2222 file.txt admin@remotehost:/home/admin
Copy multiple files from a remote host to your home directory
Syntax: scp admin@remotehost:[remote files] .
$ scp admin@remotehost:/remote/dir\{file1,file2,file3\} .

$ scp admin@remotehost:~/\{doc.txt,notes.txt\} .
Port Forwarding
SFTP Server
Login
sftp user@localhost

sftp -o Port=2222 user@remotehost
Download file
get remote_file local_file # src dst

get -r remote_file local_file # recursive

get -Pr remote_file local_file # retain permissions
Upload File
put local_file remote_file

put -r local_file remote_file
Run commands on both local and remote
To run command on your local machine, precend the command with an l for local.
sftp> pwd
Remote working directory: /home/kavish # linux
sftp> lpwd
Local working directory: /Users/kavish # mac
sftp>
Exclamation to drop inside a shell on your local machine
sftp> !
bash-3.2$ pwd
/Users/kavish
bash-3.2$
Type help to get a list of available commands
sftp> help
Securing SSH
/etc/ssh/ssd_config
Port 456
PasswordAuthentication yes
PermitEmptyPasswords no
X11Forwarding no
ClientAliveInterval 3
ClientAliveCountMax 3
LoginGraceTime 1m
PermitRootLogin no
StrictModes yes
MaxAuthTries 3
MaxSessions 10
PubkeyAuthentication yes
sshGuard
https://www.techrepublic.com/article/how-to-run-an-ssh-connection-through-tor/
Fail2ban
TCPWrappers
https://www.reddit.com/r/sysadmin/comments/mecyx7/linux_are_tcp_wrappers_still_used_nowadays/
I think now that stateful firewalling is available in kernel and in lots of networking devices, most people are pushing that kind of IP listing there instead of using TCP Wrappers.
Multi-Factor Authentication
FABRIC PYTHON
Troubleshooting
Connection Issues
Common connectivity errors:
Hostname Resolution:
ssh: Could not resolve hostname yourmachine.com: Name or service not known
- Is there a typo in the hostname ?
pingthe host and verify if your machine is resolving the hostname.- Try to login with the IP instead.
Timeout and Connection Refused:
ssh: connect to host 192.168.100.30 port 22: Connection timed out

ssh: connect to host yourmachine.com port 22: Connection refused
- Is the host IP correct ?
- Is your network or machine allowing connection over SSH ?
- Is the SSH service running ?
- Is it listening on a different port ?
Solutions
Check your firewall rules
# Ubuntu/Debian
ufw status

# CentOS

firewall-cmd --list-services
firewall-cmd --list-ports
firewall-cmd --list-all
Check the status of SSH
systemctl status sshd
Verify the listening port on the remote host
ss -ntpl | grep 22

grep Port /etc/ssh/sshd_config

sudo sshd -T | grep port
Authentication Issues
Permission Denied
MacBook-Pro:~ kavish$ ssh root@192.168.100.104
root@192.168.100.104's password:
Permission denied, please try again.
- Is it the right username ?
- Is is allowed to login as the
rootuser ? - Is password authentication allowed ? Maybe the server is only accepting public key authentication. check your
.ssh/configfile if some options are being called for this particular remote host.
Permission Denied(publickey)
MacBook-Pro:~ kavish$ ssh ubuntu
kavish@192.168.100.104: Permission denied (publickey).
That error can occur when the remote host has the following rules set in its configuration:
PubkeyAuthentication yes
PasswordAuthentication no
If PubkeyAuthentication is set to yes, and PasswordAuthentication is commented or set to yes, you would be able to log in with both your password or pubkey.
Other things to look for:
-
Is your
pubkeyin the server’sauthorized_keysfile ? If only pubkey authentication is allowed,ssh-copy-idwon’t work. Ask someone who has access to enable password auth just for this process or if you have access to server, do it manually. -
Is your private key readable ? The correct permission is
(0600/-rw-------) -
Try running
ssh -v your_IPand look fordebug1: Authentications that can continue: [auth methods will be found here]. -
Make sure the
authorized_keysfile contains the matching public key. -
Maybe the permission of the
authorized_keyson the server is not set properly. -
New verion of OpenSSH don’t support older algorithms. Like,
+ssh-dss. If you can’t generate one for whatever reason, ask the admin of the remote host to set thePubkeyAcceptedKeyTypesdirective to+ssh-dssin the/etc/ssh/sshd_configfile. This is taken from DigitalOcean.
Tip: To regenerate a pubkey from a private key, run
ssh-keygen -y -f ~/.ssh/id_rsa.
Shell Environment Issues
account is currently not available
MacBook-Pro:~ kavish$ ssh ubuntu
This account is currently not available.
Connection to 192.168.100.104 closed.
This means the user shell is assigned to /usr/sbin/nologin, /usr/bin/true, /usr/bin/false:
root@ubuntu-local:~# getent passwd | grep kavish
kavish:x:1000:1000:kavish:/home/kavish:/usr/sbin/nologin
Change it with:
usermod -s /bin/bash user

chsh -s /bin/bash user
Don’t forget to support the project.